
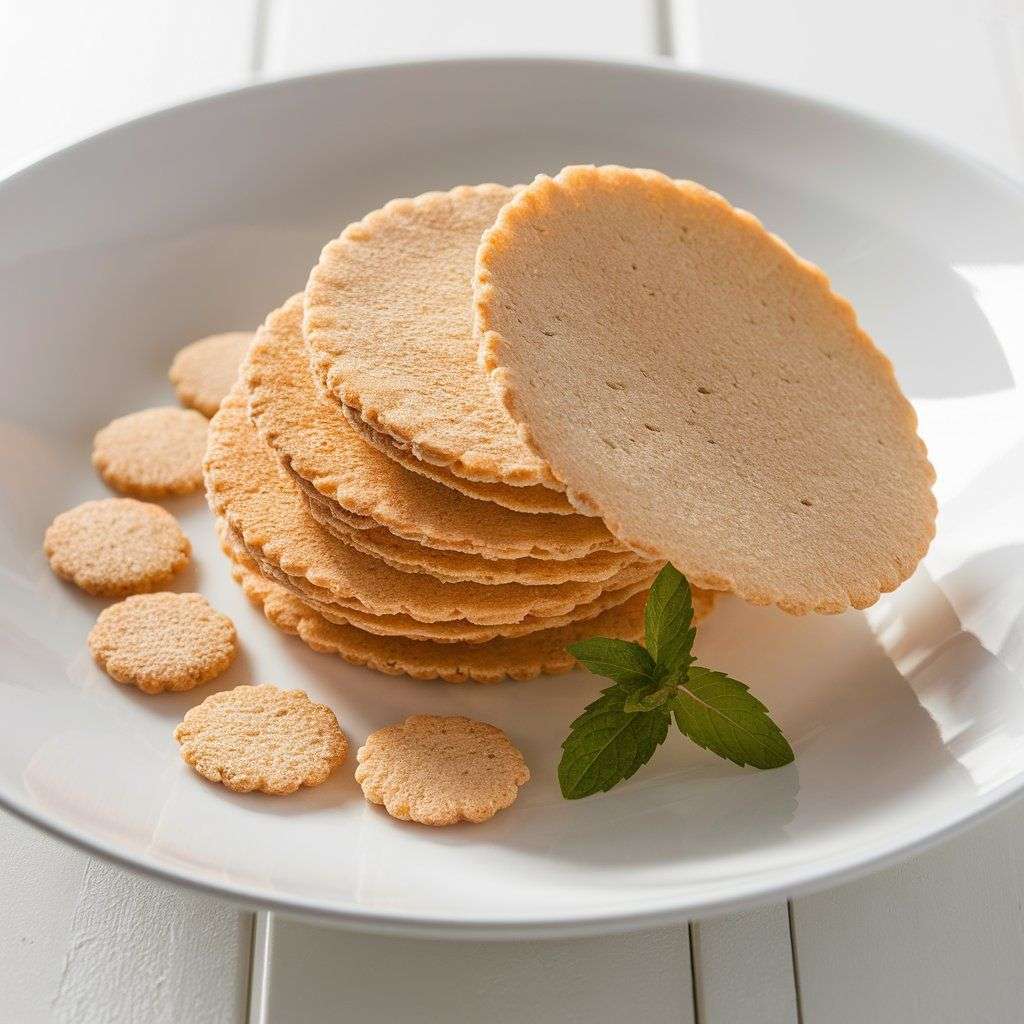
Keto Vanilla Wafers are a delicious and low-carb alternative to traditional cookies, designed to fit seamlessly into a keto lifestyle. These wafers are made with almond and coconut flours, offering a light, crisp texture that satisfies sweet cravings while keeping carbs in check. Sweetened with erythritol and flavored with vanilla extract, they deliver a delightful taste without the added sugars found in conventional treats.
The benefits of these keto-friendly wafers are numerous: they support blood sugar stability, aid in weight management, and offer a guilt-free snack option for those following a ketogenic diet. Low in carbs and high in flavor, they are ideal for anyone looking to enjoy a sweet treat while adhering to their dietary goals.
These Vanilla Wafers are perfect for a variety of occasions. They make a great snack for a quick energy boost, a delightful dessert after a meal, or a fun treat at parties and gatherings. Their versatility and appealing flavor make them a hit at any event, whether you’re hosting a casual get-together or a more formal celebration.
Keto Vanilla Wafers Recipe
Ingredients
Here’s a list of ingredients for Keto Vanilla Wafers:
- Almond Flour (1 cup):
- Description: A finely ground flour made from blanched almonds, almond flour is a staple in keto baking due to its low carb content and nutty flavor.
- Purpose: Provides the base for the wafers, giving them structure and a slightly nutty taste.
- Coconut Flour (1/4 cup):
- Description: A flour made from dried coconut meat, coconut flour is high in fiber and has a mild coconut flavor.
- Purpose: Adds texture and helps absorb moisture, creating a balanced consistency in the dough.
- Erythritol (1/4 cup):
- Description: A keto-friendly sweetener with a taste and texture similar to sugar, but with negligible calories and carbs.
- Purpose: Sweetens the wafers without affecting blood sugar levels, making them suitable for a keto diet.
- Baking Powder (1/2 teaspoon):
- Description: A leavening agent that helps the dough rise and become light and crispy.
- Purpose: Ensures the wafers have a desirable texture by creating air pockets during baking.
- Egg (1 large):
- Description: A versatile ingredient used in baking for its binding and leavening properties.
- Purpose: Helps bind the dough together and contributes to the overall texture of the wafers.
- Vanilla Extract (1 teaspoon):
- Description: A concentrated flavoring made from vanilla beans, providing a sweet and aromatic flavor.
- Purpose: Enhances the flavor of the wafers, adding a classic vanilla taste.
- Salt (1/4 teaspoon, optional):
- Description: A common seasoning used to enhance flavors in baked goods.
- Purpose: Balances the sweetness and brings out the overall flavor of the wafers.
- Butter or Coconut Oil (2 tablespoons, optional):
- Description: Butter or coconut oil adds richness and moisture to the dough.
- Purpose: Improves the texture and flavor of the wafers, making them more indulgent. Melt before adding to the dough for even distribution.
Each ingredient plays a specific role in creating the perfect keto-friendly vanilla wafers, ensuring they are both delicious and compliant with a low-carb diet.
Instructions
Here are the detailed instructions for making Keto Vanilla Wafers in 4 steps:
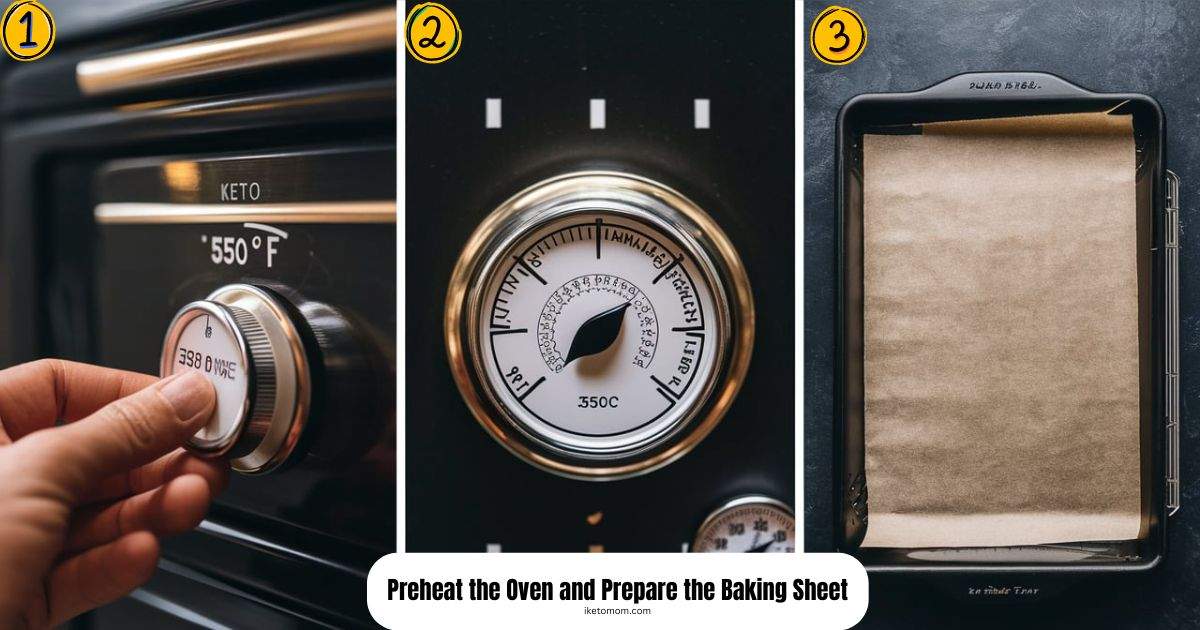
1. Preheat the Oven and Prepare the Baking Sheet:
-
- Preheat your oven to 350°F (175°C).
- Line a baking sheet with parchment paper to prevent the wafers from sticking and ensure even baking.
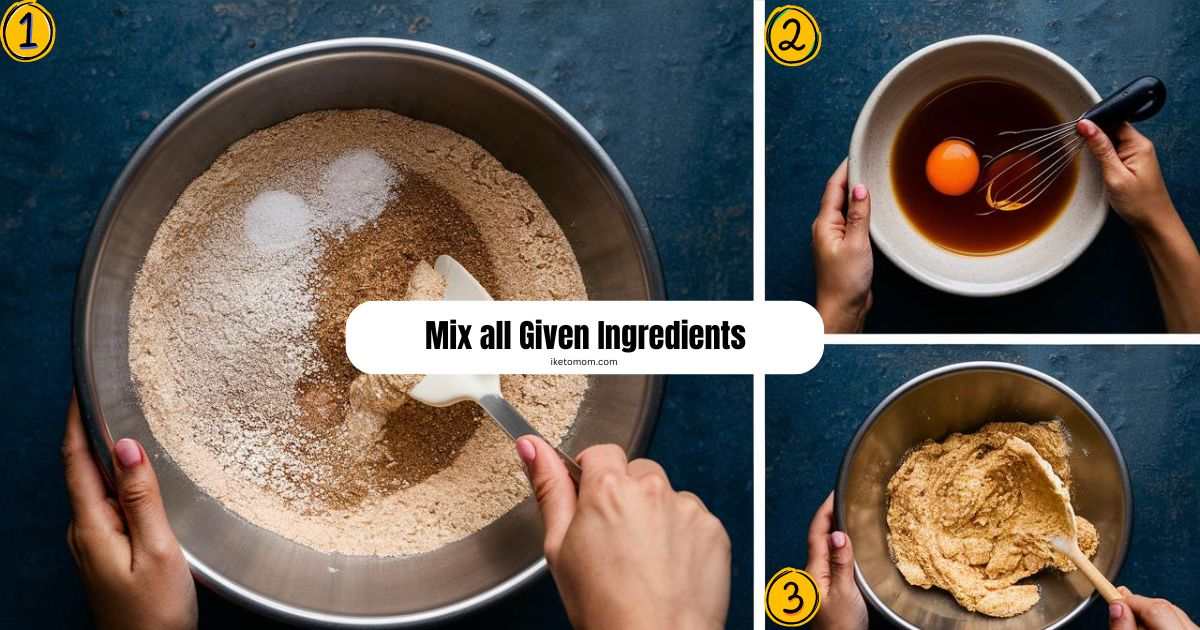
2. Mix all Given Ingredients:
-
- In a large mixing bowl, combine 1 cup of almond flour, 1/4 cup of coconut flour, 1/4 cup of erythritol (or another keto sweetener), 1/2 teaspoon of baking powder, and 1/4 teaspoon of salt (if using). Mix these dry ingredients together until evenly distributed.
- In a separate bowl, whisk together 1 large egg and 1 teaspoon of vanilla extract.
- Gradually add the wet ingredients to the dry ingredients, mixing until a dough forms. If using, melt 2 tablespoons of butter or coconut oil and fold it into the dough for added richness.
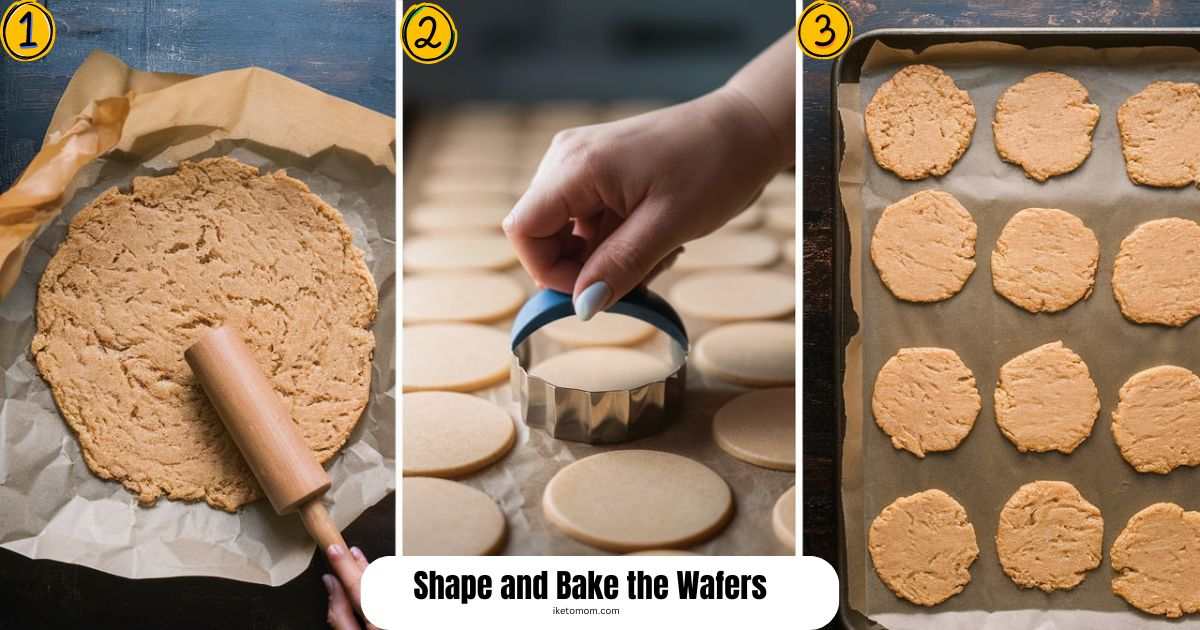
3. Shape and Bake the Wafers:
-
- Place the dough between two sheets of parchment paper. Use a rolling pin to roll the dough out to about 1/8 inch thickness.
- Cut the dough into desired shapes using a cookie cutter or small round cutter. Arrange the cut-outs on the prepared baking sheet, spacing them about 1 inch apart.
- Bake in the preheated oven for 10-12 minutes, or until the edges are golden brown.
4. Cool and Serve:
-
- Remove the baking sheet from the oven and let the wafers cool on the sheet for a few minutes. Transfer the wafers to a wire rack to cool completely. This helps them become crisp as they cool.
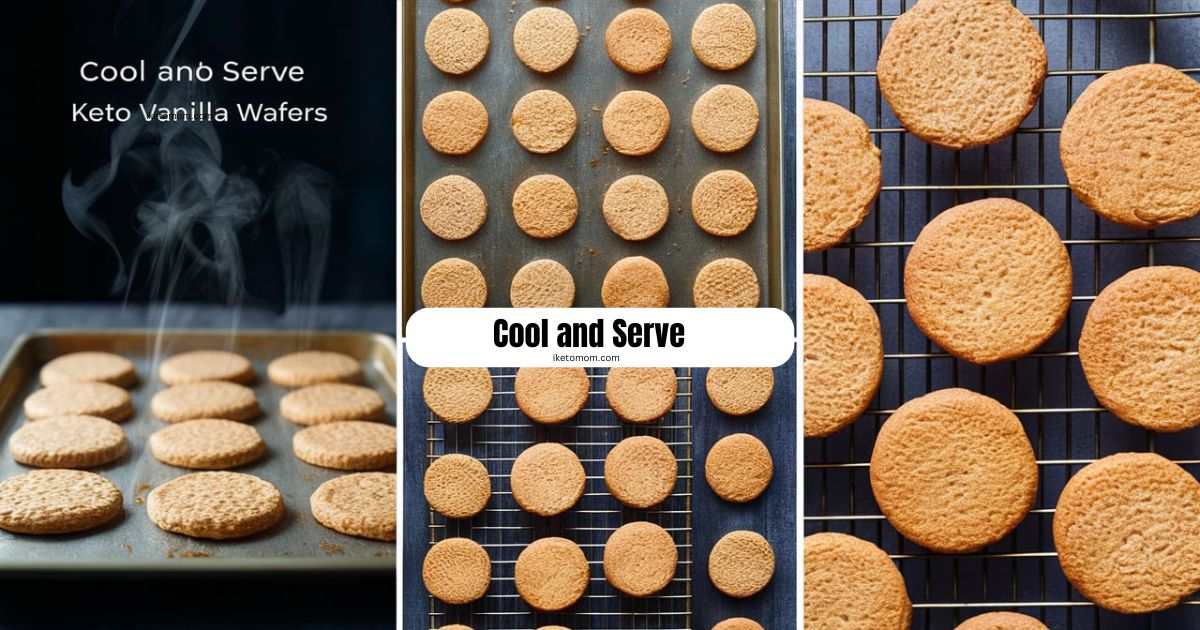
After the wafers have cooled completely, serve them as a delightful treat for any occasion. Whether enjoyed on their own or paired with keto-friendly dips, these vanilla wafers are sure to be a hit. Store any leftovers in an airtight container to maintain their crispiness and enjoy them as a sweet, low-carb snack whenever you like.
Also, Try:Keto Graham Crackers Recipe, Keto Strawberry Cheesecake, Keto Lemon Cheesecake Recipe
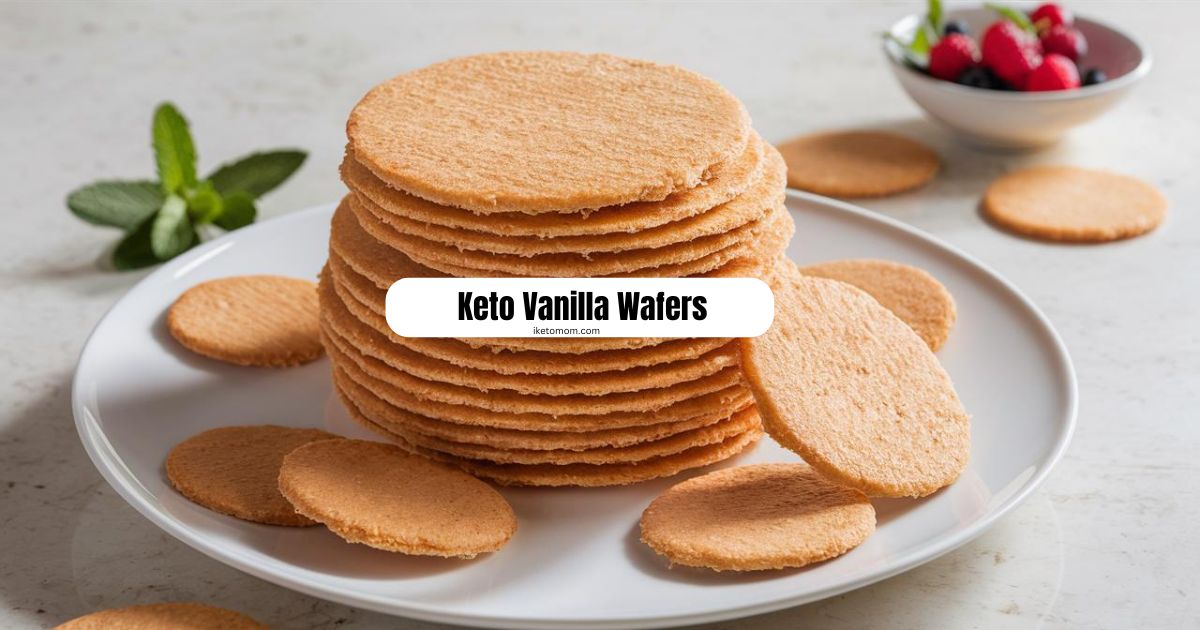
Keto Vanilla Wafers are a delicious and low-carb alternative to traditional cookies, perfect for those following a ketogenic diet. Made with a blend of almond flour and coconut flour, these wafers offer a light, crispy texture and a sweet vanilla flavor, all while keeping your carb intake in check. Sweetened with erythritol, they provide the perfect amount of sweetness without impacting blood sugar levels, making them an ideal treat for anyone on a low-carb or keto lifestyle.
These wafers are versatile and suitable for various occasions. They can be enjoyed as a quick snack, a satisfying dessert, or a fun party treat. Their appealing flavor and crispy texture make them a crowd-pleaser at gatherings, while their ease of preparation ensures they can be a regular part of your low-carb snacking routine. Whether you’re hosting a party or simply craving a sweet treat, Keto Vanilla Wafers are a great choice for a delicious and diet-friendly indulgence.
Keto Vanilla Wafers Nutrition Info
Here’s a basic nutrition table for Keto Vanilla Wafers, assuming the recipe makes 12 wafers and includes butter. For precise nutritional information, it’s best to use a nutrition calculator based on the specific ingredients and brands used.
| Nutrient |
Per Wafer (1/12 of recipe)
|
| Calories | 75 |
| Total Fat | 6 g |
| Saturated Fat | 1 g |
| Cholesterol | 22 mg |
| Sodium | 55 mg |
| Total Carbohydrates | 3 g |
| Dietary Fiber | 2 g |
| Sugars | 0 g |
| Protein | 2 g |
For a more accurate nutritional profile, especially if you have specific dietary needs, consider using a nutrition calculator or app.
Here’s a combined nutrition table for each ingredient used in the Keto Vanilla Wafers recipe:
| Ingredient | Amount | Calories | Total Fat | Saturated Fat | Cholesterol | Sodium | Total Carbohydrates | Dietary Fiber | Sugars | Protein |
|---|---|---|---|---|---|---|---|---|---|---|
| Almond Flour | 1 cup (96 g) | 560 | 48 g | 4 g | 0 mg | 0 mg | 20 g | 12 g | 1 g | 21 g |
| Coconut Flour | 1/4 cup (30 g) | 60 | 2.5 g | 2.3 g | 0 mg | 0 mg | 16 g | 10 g | 0 g | 2 g |
| Erythritol | 1/4 cup (50 g) | 0 | 0 g | 0 g | 0 mg | 0 mg | 0 g | 0 g | 0 g | 0 g |
| Butter | 2 tablespoons (28 g) | 200 | 22 g | 14 g | 61 mg | 2 mg | 0 g | 0 g | 0 g | 0 g |
| Egg | 1 large (50 g) | 70 | 5 g | 1.6 g | 186 mg | 70 mg | 0.6 g | 0 g | 0.6 g | 6 g |
| Vanilla Extract | 1 teaspoon (5 g) | 12 | 0 g | 0 g | 0 mg | 0 mg | 0 g | 0 g | 0 g | 0 g |
| Salt | 1/4 teaspoon (1.5 g) | 0 | 0 g | 0 g | 0 mg | 570 mg | 0 g | 0 g | 0 g | 0 g |
This table summarizes the nutritional values for each ingredient used in the recipe.

Keto Vanilla Wafers Recipe
Equipment
- Mixing bowls For combining dry and wet ingredients.
- Whisk or Electric Mixer To mix ingredients until well combined.
- Baking sheet For placing the wafers to bake.
- Parchment Paper To line the baking sheet and prevent sticking.
- Rolling Pin To roll out the dough evenly.
- Cookie Cutter or Small Round Cutter (optional): To cut the dough into desired shapes.
- Wire Rack (optional): For cooling the wafers after baking.
Ingredients
- 1 Cup Almond Flour
- 1/4 Cup Coconut Flour
- 1/4 Cup Erythritol (or other keto sweetener)
- 1/2 Teaspoon Baking Powder
- 1 Large Eggs
- 1 Teaspoon Vanilla Extract
- 1 Teaspoon Salt
- 2 Teaspoons Butter or Coconut Oil
Instructions
- Preheat the oven to 350°F (175°C) and line a baking sheet with parchment paper.
- Mix 1 cup almond flour, 1/4 cup coconut flour, 1/4 cup erythritol, 1/2 teaspoon baking powder, and 1/4 teaspoon salt in a bowl.
- Whisk 1 egg and 1 teaspoon vanilla extract; combine with the dry ingredients. Fold in 2 tablespoons melted butter or coconut oil if desired.
- Roll out the dough between parchment paper, cut into shapes, and place on the baking sheet. Bake for 10-12 minutes until golden brown.
- Cool on the baking sheet for a few minutes, then transfer to a wire rack to cool completely.
Notes
- Ingredient Measurements: Ensure accurate measurements for each ingredient to achieve the best texture and taste. Using too much or too little flour or sweetener can affect the outcome.
- Butter or Coconut Oil: If using butter or coconut oil, melt it before adding to the dough. This adds richness and helps with the texture.
- Dough Consistency: If the dough is too sticky, add a little more almond flour. If it's too dry, add a small amount of water or milk (unsweetened almond milk works well).
- Cutting Shapes: For consistent results, use a cookie cutter or round cutter. Ensure wafers are evenly spaced on the baking sheet to allow for proper baking.
- Cooling: Let the wafers cool completely on a wire rack after baking to ensure they become crisp. They may be soft when first removed from the oven but will harden as they cool.
- Storage: Store the cooled wafers in an airtight container at room temperature for up to a week, or refrigerate for longer freshness.
- Variations: Feel free to experiment with added spices or flavorings, such as cinnamon or lemon zest, to customize the wafers to your taste.
Delicious Topping Ideas
Here are some delicious topping ideas to enhance your Keto Vanilla Wafers:
- Sugar-Free Chocolate Drizzle:
- Melt some sugar-free chocolate and drizzle it over the cooled wafers for a rich and indulgent touch.
- Whipped Cream Cheese:
- Spread a thin layer of whipped cream cheese on top for a creamy, tangy contrast that complements the sweetness of the wafers.
- Berries:
- Top the wafers with a few fresh berries like raspberries or strawberries. Their tartness pairs well with the sweet vanilla flavor.
- Chopped Nuts:
- Sprinkle some chopped nuts, such as almonds or pecans, over the wafers for added crunch and flavor.
- Coconut Flakes:
- Add a sprinkle of unsweetened shredded coconut for a bit of extra texture and a hint of coconut flavor.
- Keto-Friendly Jam:
- Spread a thin layer of keto-friendly berry jam or preserves on the wafers for a fruity twist.
- Cinnamon and Erythritol:
- Mix a small amount of erythritol with ground cinnamon and lightly sprinkle it over the wafers for a sweet and spicy touch.
- Nut Butter:
- Drizzle or spread a thin layer of almond or peanut butter on top for a creamy, nutty flavor.
These toppings can add variety and extra taste to your Keto Vanilla Wafers, making them even more enjoyable and customizable to your preferences.
FAQ
Can I substitute almond flour with another type of flour?
If you need to substitute almond flour, consider the following options:
- Sunflower Seed Flour:
- Description: Made from ground sunflower seeds, this flour is a popular nut-free alternative.
- Impact: It has a similar texture to almond flour but may give a slightly different taste. It’s also keto-friendly and can be used in a 1:1 ratio.
- Coconut Flour:
- Description: Made from dried coconut meat, it’s high in fiber and absorbs more moisture.
- Impact: Coconut flour is not a direct 1:1 substitute due to its higher absorbency. Typically, you’ll need to use about 1/4 to 1/3 of the amount of coconut flour compared to almond flour and increase the liquid in the recipe.
- Flaxseed Meal:
- Description: Ground flaxseeds, which add fiber and healthy fats.
- Impact: It can be used in place of almond flour, but it may alter the flavor and texture. It’s best used in combination with other low-carb flours.
- Chia Seed Flour:
- Description: Made from ground chia seeds, it provides fiber and omega-3s.
- Impact: Like flaxseed meal, chia seed flour can substitute almond flour but may change the texture. It’s best used in moderation or blended with other flours.
When substituting almond flour, remember that the texture and flavor of your final product might differ slightly. Adjusting other ingredients, like liquids, may also be necessary to achieve the right consistency.
How do I store leftover Keto Vanilla Wafers?
To store leftover Keto Vanilla Wafers and maintain their freshness, follow these guidelines:
- Room Temperature:
- Method: Store the wafers in an airtight container.
- Duration: They can be kept at room temperature for up to a week.
- Tip: Place a piece of parchment paper between layers of wafers to prevent them from sticking together.
- Refrigeration:
- Method: Place the wafers in an airtight container or resealable bag.
- Duration: They can be stored in the refrigerator for up to two weeks.
- Tip: Allow them to cool completely before refrigerating to prevent condensation.
- Freezing:
- Method: Place the cooled wafers in a freezer-safe container or resealable plastic bag. Separate layers with parchment paper to prevent sticking.
- Duration: They can be frozen for up to three months.
- Tip: Thaw them at room temperature for a few minutes before eating or crisp them up in a toaster oven for a few minutes.
By following these storage methods, you can keep your Keto Vanilla Wafers fresh and crispy for a longer period.
Can I make these wafers ahead of time?
Yes, you can make Keto Vanilla Wafers ahead of time. Here’s how:
- Baking Ahead:
- Method: Bake the wafers as directed, let them cool completely, and store them in an airtight container.
- Storage: At room temperature, they will stay fresh for up to a week. For longer storage, keep them in the refrigerator for up to two weeks or freeze them for up to three months.
- Tip: If freezing, layer the wafers with parchment paper in between to prevent them from sticking together.
- Preparing the Dough:
- Method: Prepare the dough and refrigerate it for up to 24 hours before baking. This can make it easier to handle and shape.
- Storage: Keep the dough wrapped in plastic wrap or in an airtight container to prevent it from drying out.
- Tip: Allow the dough to come to room temperature before rolling out and baking.
- Freezing the Dough:
- Method: Shape the dough into discs or logs, wrap them tightly, and freeze.
- Storage: The frozen dough can be stored for up to three months.
- Tip: Thaw the dough in the refrigerator overnight before baking.
Making the wafers or dough ahead of time can save you effort and time on the day you plan to serve them, ensuring you have a delicious keto treat ready when you need it.
Why are my wafers soft instead of crispy?
If your Keto Vanilla Wafers are coming out soft instead of crispy, here are some potential reasons and solutions:
- Underbaking:
- Reason: Wafers need to be baked until they are golden around the edges. If they are underbaked, they might remain soft.
- Solution: Ensure that the wafers are baked long enough. Start checking them a few minutes before the recommended baking time to avoid overbaking.
- Dough Consistency:
- Reason: If the dough is too thick or too soft, it can affect the crispiness of the wafers.
- Solution: Adjust the dough consistency by adding a bit more almond flour if it’s too sticky or a small amount of water if it’s too dry. Chilling the dough can also make it easier to handle and shape.
- Oven Temperature:
- Reason: An incorrect oven temperature can lead to uneven baking. If your oven is too cool, the wafers may not crisp up properly.
- Solution: Use an oven thermometer to check the accuracy of your oven’s temperature. Bake the wafers at the recommended temperature and adjust if necessary.
- Moisture Content:
- Reason: Excess moisture in the dough or from the environment can prevent the wafers from becoming crispy.
- Solution: Ensure that the wafers are completely cooled on a wire rack to allow air circulation and prevent moisture buildup.
- Thickness of the Wafers:
- Reason: If the wafers are too thick, they may not crisp up as desired.
- Solution: Roll the dough out to an even, thin layer before cutting into shapes. Thin wafers tend to be crispier.
- Baking Sheet Preparation:
- Reason: If the baking sheet is not lined or greased properly, it can affect the texture of the wafers.
- Solution: Line your baking sheet with parchment paper to ensure even baking and prevent sticking.
By addressing these factors, you can achieve the desired crispy texture for your Keto Vanilla Wafers.

I’m Priscilla Swahn, a registered dietitian with a master’s degree in nutritional sciences. With over a decade of experience in holistic nutrition, I specialize in creating delicious keto recipes to help you enjoy a healthy lifestyle. On iKetoMom, you’ll find a variety of recipes for every meal—hearty breakfasts, satisfying lunches, mouthwatering dinners, indulgent desserts, and refreshing drinks. My recipes make keto living easy and enjoyable for the whole family. Featured in EatingWell and MindBodyGreen, I also collaborate with health centers and corporate companies to share my expertise. Join me and discover the joy of keto cooking!